Best Practice: Terraform State in Azure Blob Container
Configurations you should consider on your Storage Account
Locating your Terraform state file remotely in an Azure Blob Storage shouldn't be as easy as creating a container and configuring the backend, you should consider some best practices. In this post I will outline practices I've used when securing and implementing redundancy to a Storage Account containing Terraform state files.
Note: Some settings may increase the cost of your Storage Account so please refer to Microsoft's pricing page. You should also consider each practice as a recommendation and evaluate based on your setup/needs.
Subscription and Resource Permissions
When storing Terraform state files in a Storage Account, you need to review the permissions of the Subscription, Resource Group and Resource. Terraform state files contain sensitive information and should itself be considered sensitive. Check IAM (Identity and Access Management) to make sure those who need access to the resource have permissions and those who shouldn't are removed. Consider SAS (Shared Access Signature) as another means of authentication (mentioned further down in this post).
You can locate IAM in the left sidebar with the name Access Control (IAM) from any subscription, resource group or resource.

Selected Networks
You can secure access to your Blob container by allowing access through selected networks. Specifying networks reduce outside threats to the data because only users who are on the specified networks are granted access after authentication.
To configure this, go into your Storage Account and select from the left side menu Networking. From here you can then change the radio button from All Networks to Selected Networks where you can then configure your network settings.

Azure Defender
Azure Defender by default is disabled but can be enabled on the entire Storage Account. Azure Defender detects access attempts on containers that are deemed to be harmful. If you are only using the Storage Account to contain state files in a Blob container, then the cost based on per 10,000 transactions is very low and should be considered as a setting to be enabled.
To enable, select Security from the left side menu within the Storage Account.

From here you can then select the Enable Azure Defender for Storage (you will also be given a current transaction amount this storage account has processed to help with estimating costs).

Geo Replication
There are three forms of replications you can configure, LRS (Locally Redundant Storage), GRS (Geo Redundant Storage) and RA-GRS (Read Access Geo Redundant Storage). Depending on the availability of the data, I would consider either GRS or RA-GRS replication on an environment where Terraform is used to manage many resources. GRS will perform the same synchronization of data that of LRS (three copies to the local region) but will then copy the data to a secondary region. RA-GRS will do the same as GRS but the data will only be read only. Choosing one of these replication types depends on if you want to have a read-only copy of the data in another region or if you want to actively use that copy of data when the source region is down.
Geo Replication can be configured during setup of the Storage Account and reconfigured after its created. To reconfigure an existing Storage Account's replication, select Configuration from the left side menu.

Within the window you can select the from Replication dropdown the type of replication you want for the Storage Account.

Soft Delete
As a precaution, make sure soft delete is enabled. The more days you add onto the soft delete, the more you pay as the data is stored somewhere so set something sensible like 30 days. After the specified soft delete time has been reached, the data is permanently deleted.
To check soft delete is configured, select Data Protection from the left side menu.

Here you can enable and configure Turn on soft delete for blobs.

Versioning
Versioning is an important setting when it comes to file recovery. You can select the Terraform state file and look back at every change that's been uploaded for that file, allowing you to recover from a previous version by making it the current version. Turn this on if not already enabled.
To enable versioning, select Data Protection from the left side menu.

Then check the box next to Turn on versioning for blobs

Change Feed
For observability I recommend enabling Blob Change Feed so changes made on the Blob container are audited for security and investigation purposes. You can either read the log files within the container or use alternative methods to ingest this data to monitor/read.
Enabling change feed, select Data Protection from the left side menu.

From here you can then check the box next to Turn on blob change feed.

Public Access
By default, Blob public access is enabled. To prevent any misconfiguration, disabling public access is the sensible option so only authenticated methods can access resources. Refer to the Microsoft documentation on preventing anonymous read access to Blob storage.
To disable public access, select Configuration from the left side menu.

Select Disabled under the heading Allow Blob public access.

Access Level
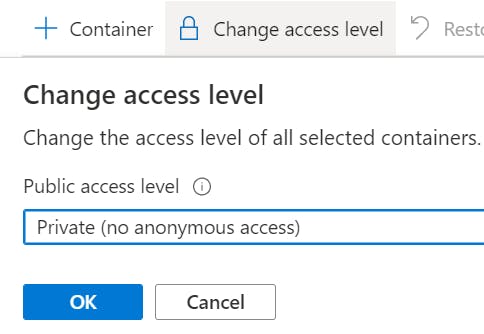
There are three access level tiers to a Blob Container, Private, Blob and Container. Private is the only container that prevents anonymous access to the data inside and should be the one to choose. If you've already disabled Public Access, then Private would be applied to all containers and the other two options would not be available.
Select Container from the side menu.

Select a Blob container and select Change access level from the top of the window to then be able to change access level tier.

Delete Lock
Prevent your Storage Account from being deleted by configuring a Lock so deletion cannot happen without the lock being removed.
To set a delete lock, select Locks from the side menu within Storage Account.

From here you can then create a new lock and set the type as Delete.
SAS Tokens
Consider SAS tokens if you are granting access to individuals/applications for a specific period. SAS tokens can then be used to authenticate to the backend using the specified configuration HashiCorp lists on their site. This reduces the need of creating Service Principals or Managed Service Identities (MSI).
Snapshots
I would only recommend taking a snapshot if you are going to manipulate the state file. This would give you an additional recovery point if the state file breaks in some way (I have failed manipulating a recovery file and no recovery point to revert back to). Versioning is an option to recover from but as a precautionary measure, I feel a snapshot is good to have and then delete once you confirm the file is working as intended.

