Executive technology leader responsible for platform reliability, cloud operations, security posture, and enterprise technology risk within an investor-backed fintech environment. I lead technology operations at the intersection of engineering execution, governance, and business outcomes — ensuring platforms are scalable, resilient, and trusted by investors, regulators, and clients.
Currently VP of DevOps at InvestorFlow, where I focus on building board-ready technology operations, strengthening risk and resilience, and shaping long-term platform strategy to support growth and regulatory confidence.
For the first in a series of posts, we will cover how to get started with Azure B2C. This post will cover how to set up a web app, using a sample repo provided by Microsoft, to link to an Azure B2C we will be setting up.
By the end of the post, you will have a web app running locally on your computer, with signup and login methods running through an Azure B2C instance.
Prerequisites
We will be using the following git repository, so either clone it or fork the repo if you want to store your changes (make sure if you fork it, you make it private): https://github.com/Azure-Samples/active-directory-aspnetcore-webapp-openidconnect-v2
You will also need the following:
You will need at least the Tenant Creators role assigned
Azure Subscription
Visual Studio or Visual Studio Code (Installed)
.NET SDK 7.0.* (Installed)
Register an Azure B2C Resource
Within your existing tenant, select Create Resource and search and select Azure Active Directory B2C
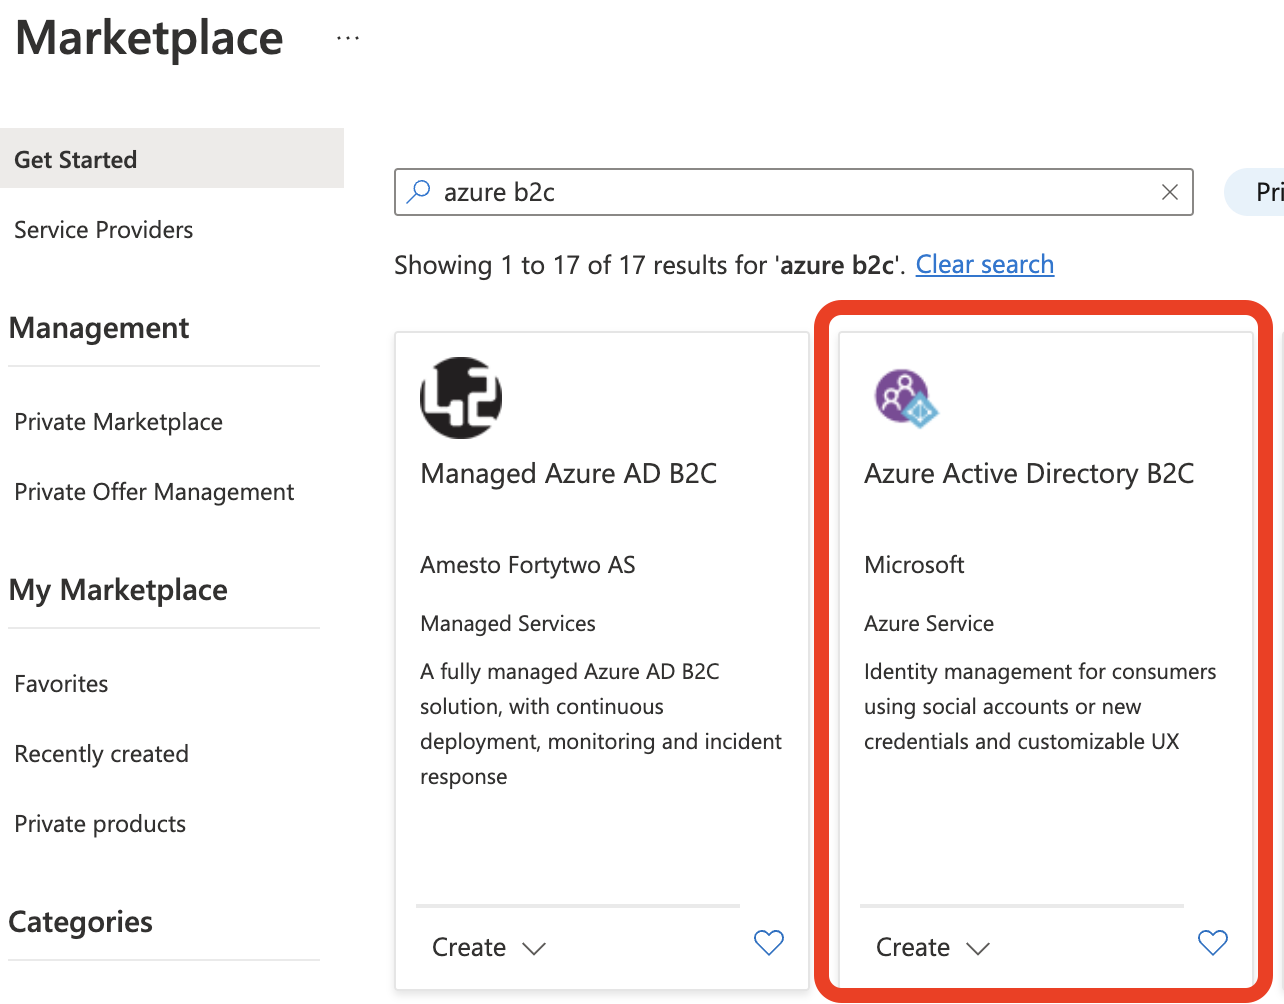
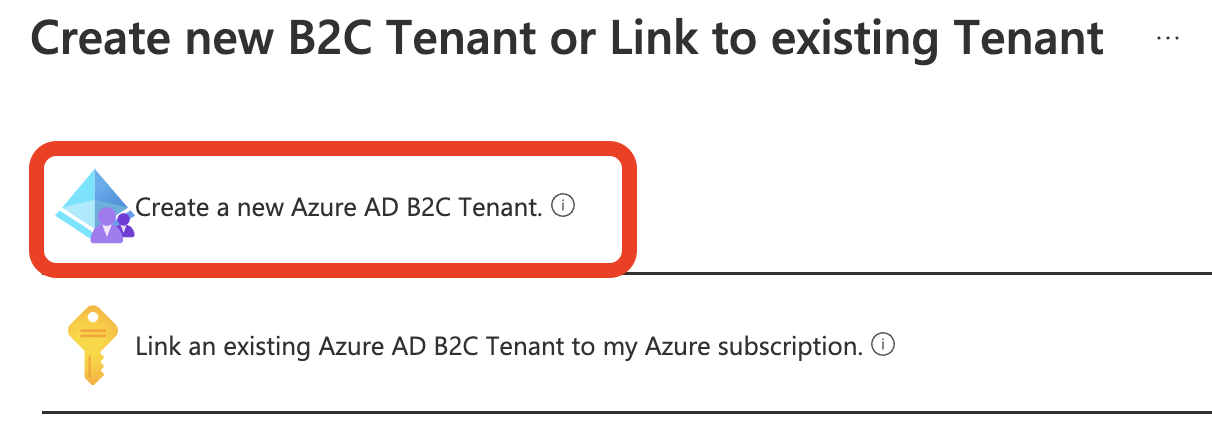
Select Create a new Azure AD B2C Tenant
Now we need to configure the directory. You will need to complete the following fields:
Organization name: The name of the organisation you are setting this up for.
Initial domain name: The name you want to give your Azure B2C domain
Location: The location you want to deploy the instance to
Subscription: The Azure Subscription you are going to use
Resource group: The resource group you are storing the instance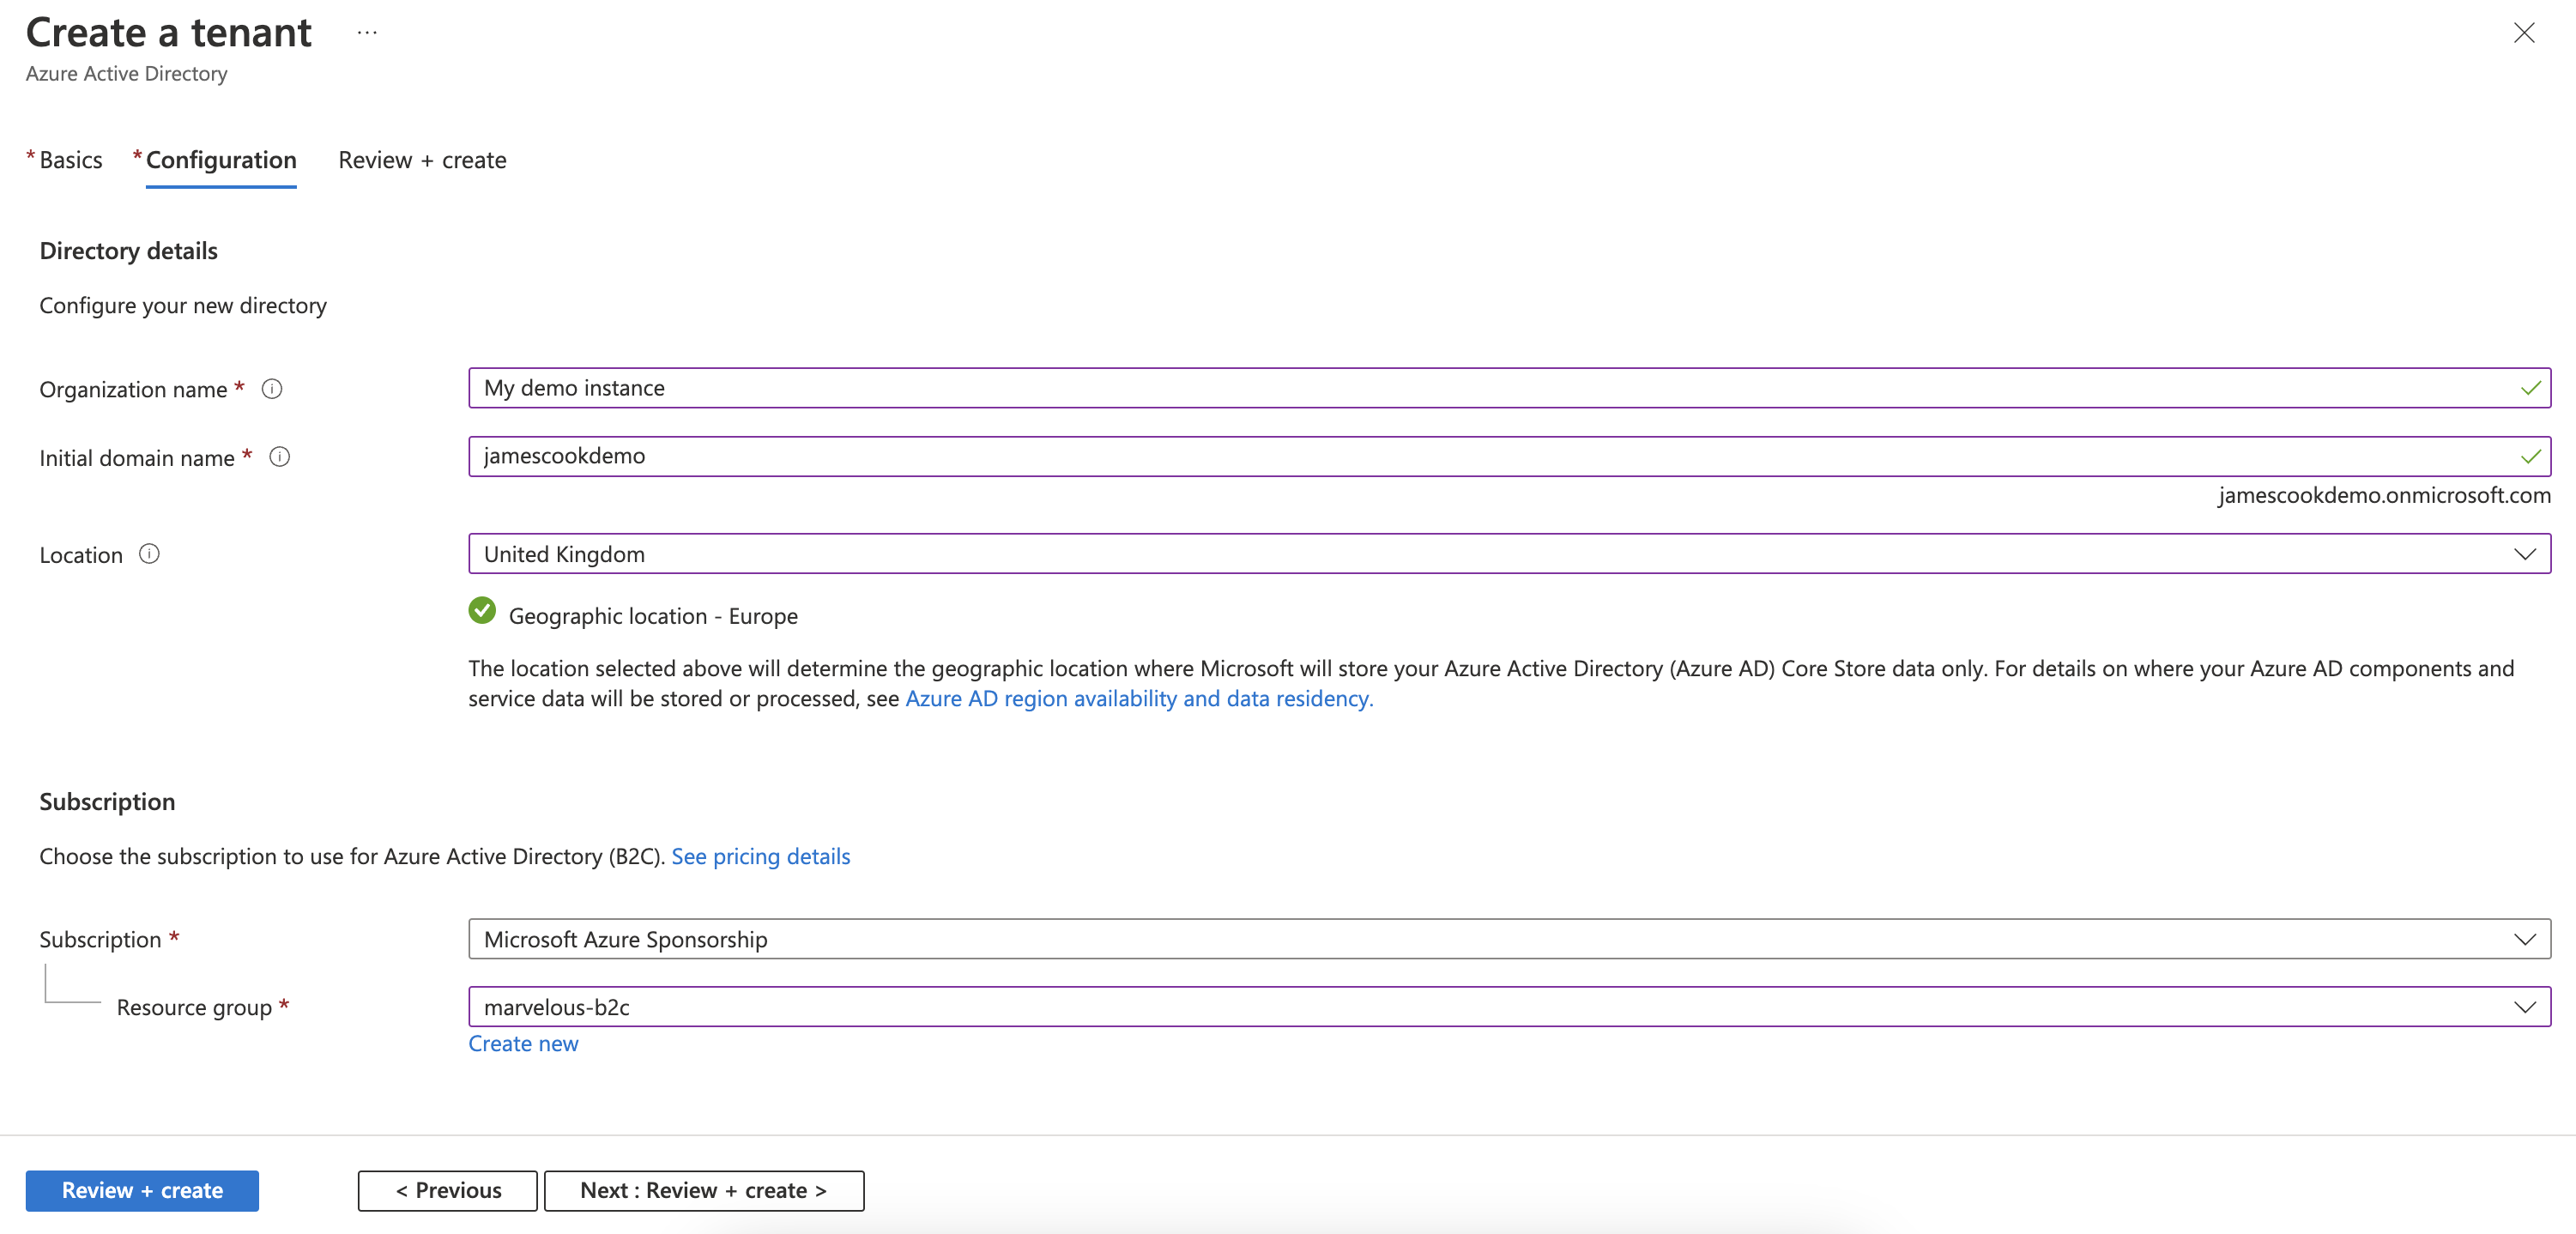
When you have entered the fields, select Review + create and then Create
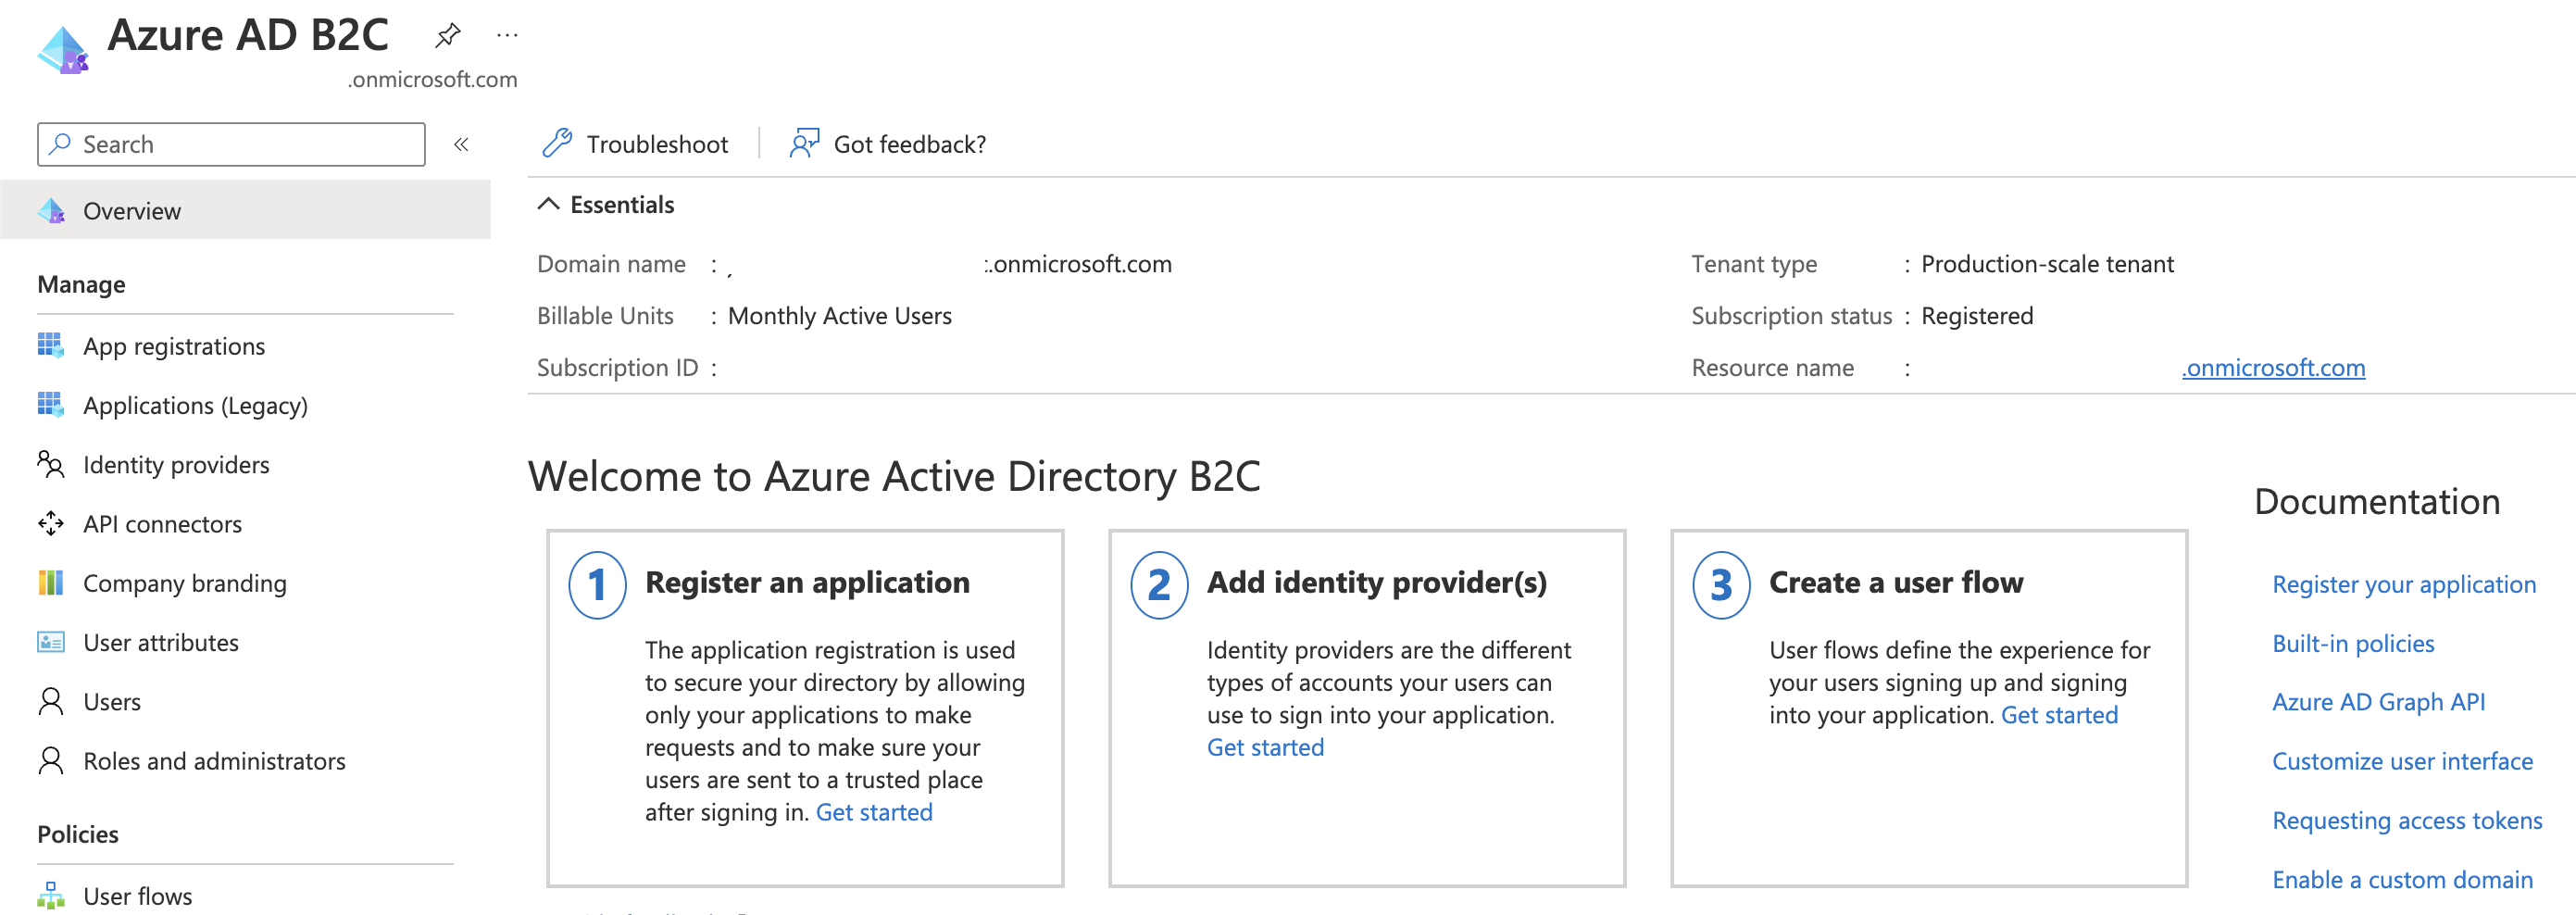
Once the resource is deployed, open it, and you will be presented with the Overview page
Web Application Registration
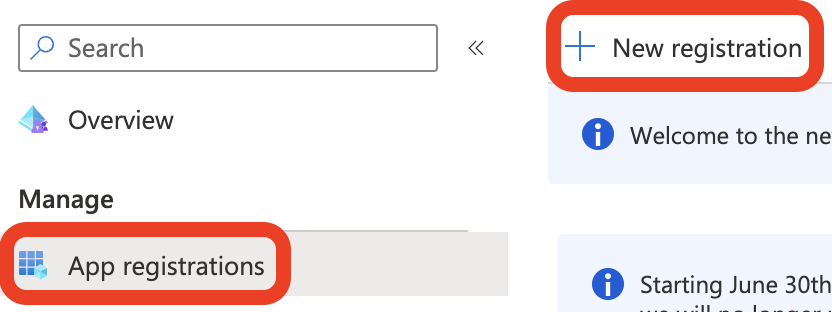
Now we have an Azure B2C instance; we will need to create a web application registration for our local instance to utilise.
Select App registrations and then select New registration.
Complete the following fields:
Name: Name your application registration. It can be renamed later.
Supported account types: Select Accounts in any identity provider or organization directory
Redirect URI: from the dropdown, select Web, and in the textbox, enter https://localhost:44316/signin-oidc
Permissions: check Grant admin consent to opened and offline_access permissions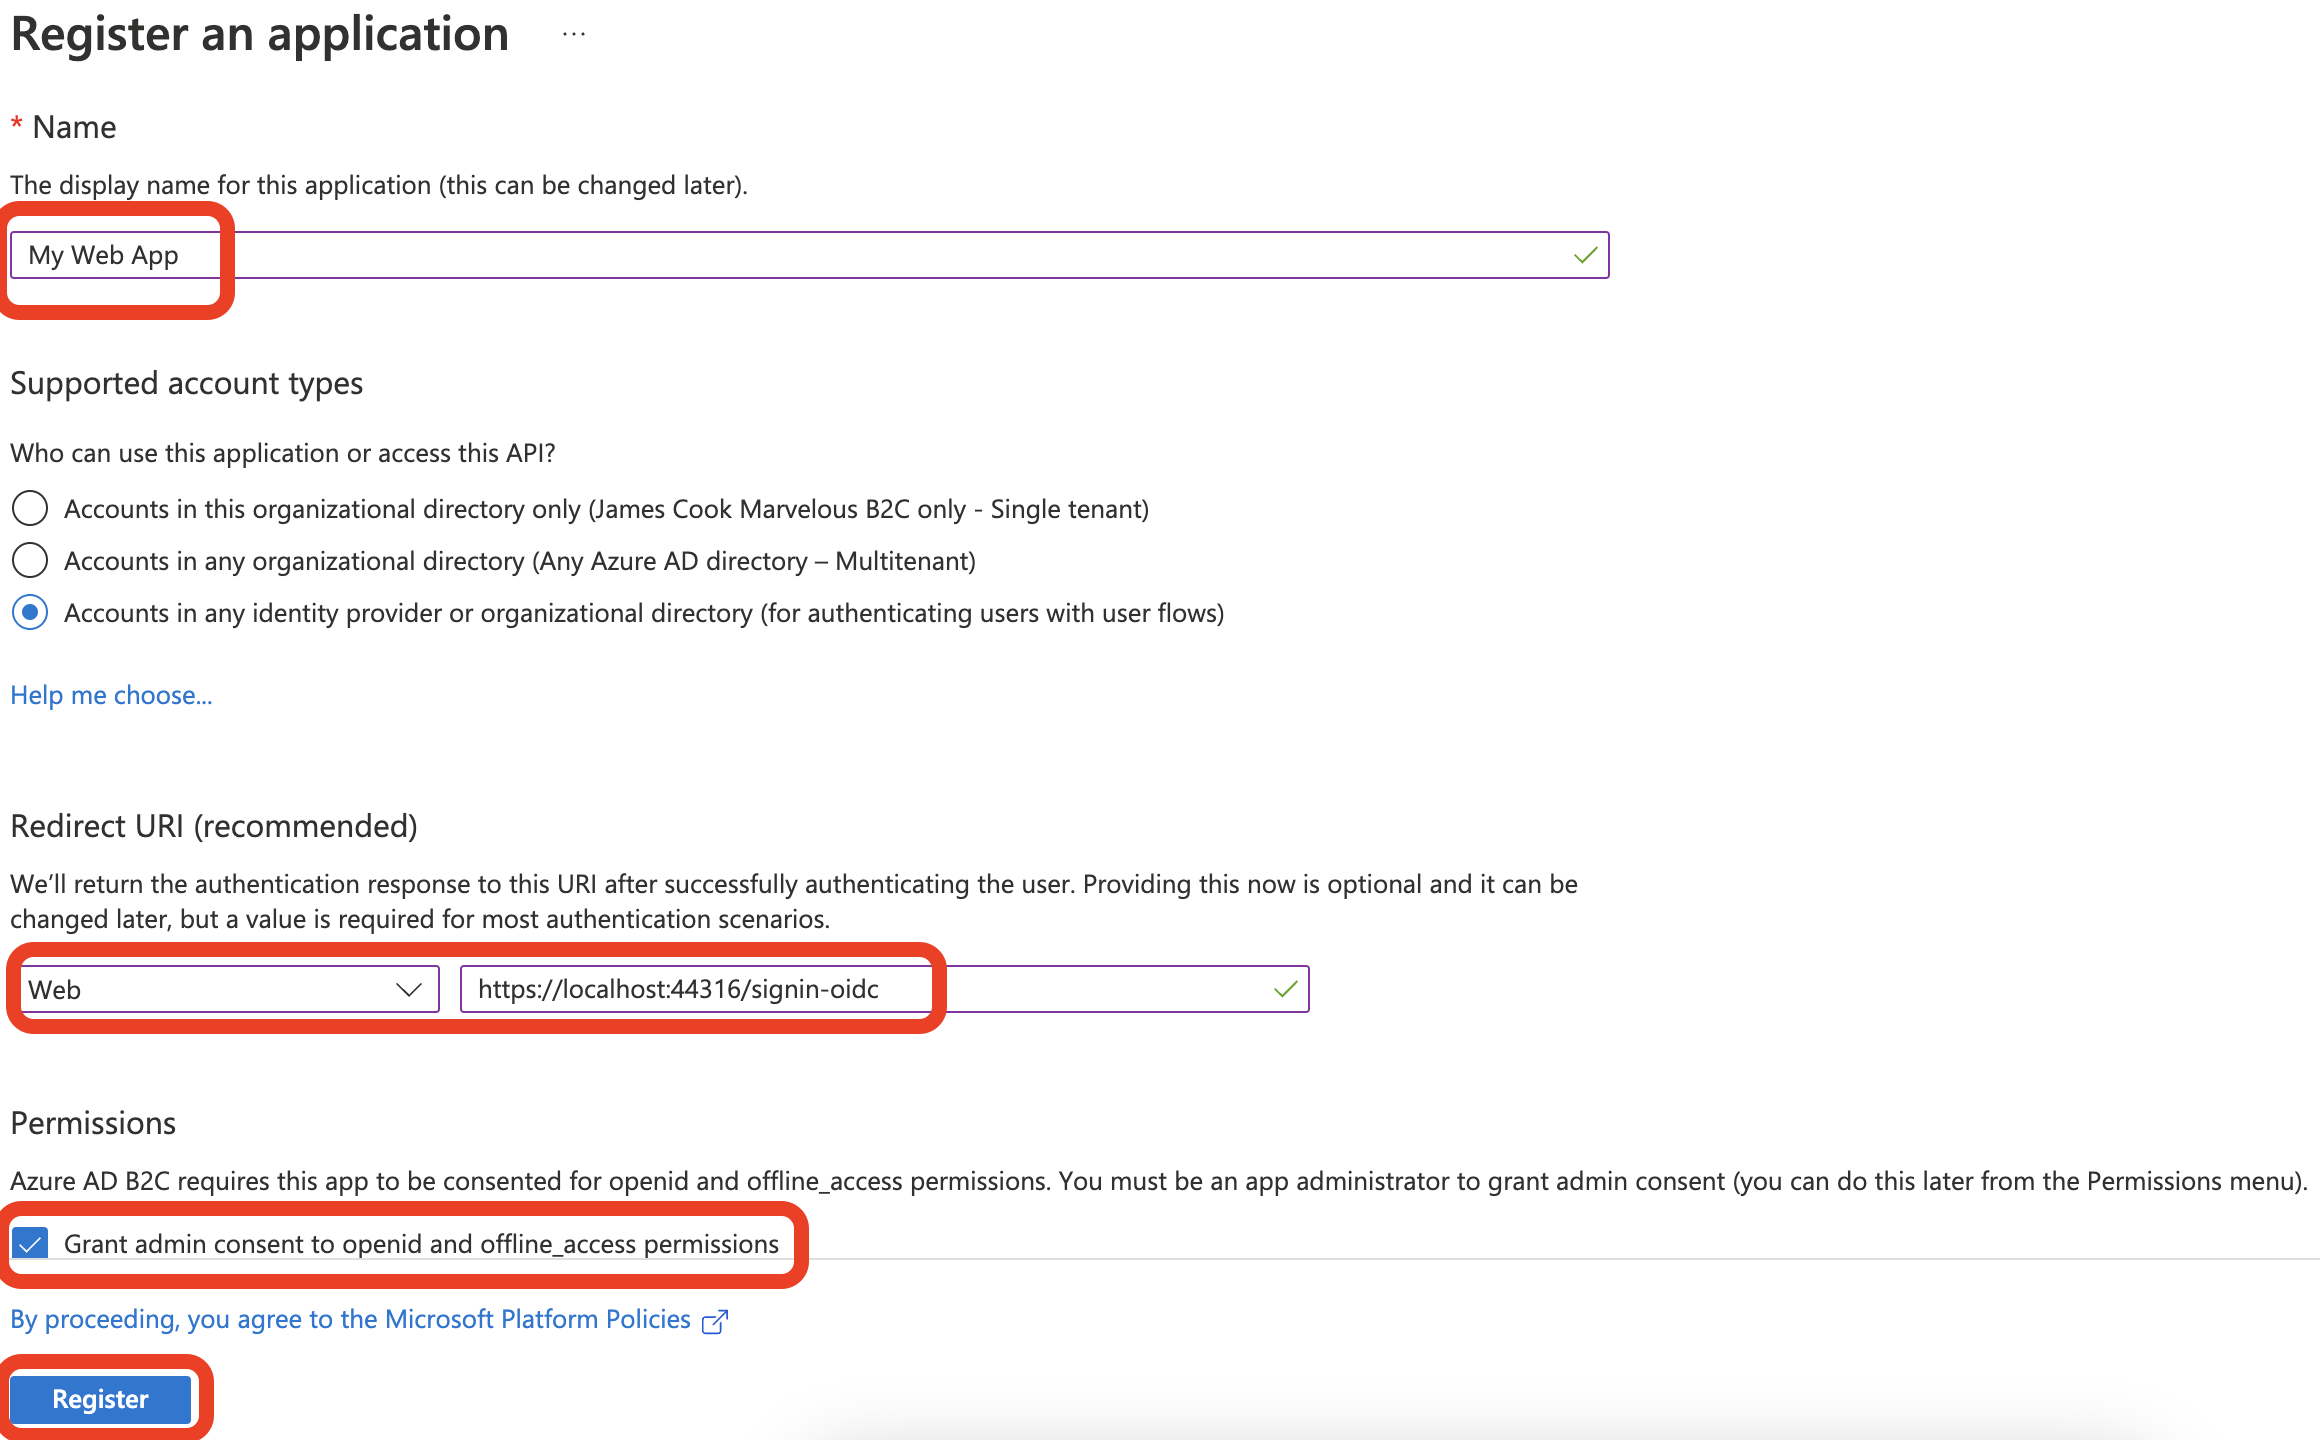
Once all fields are completed, select Register.
Once registered, you can select from the side menu Authentication and check the following two items under the heading Implict grant and hybrid flows:
Access tokens (used for implicit flows)
ID tokens (used for implicit and hybrid flows)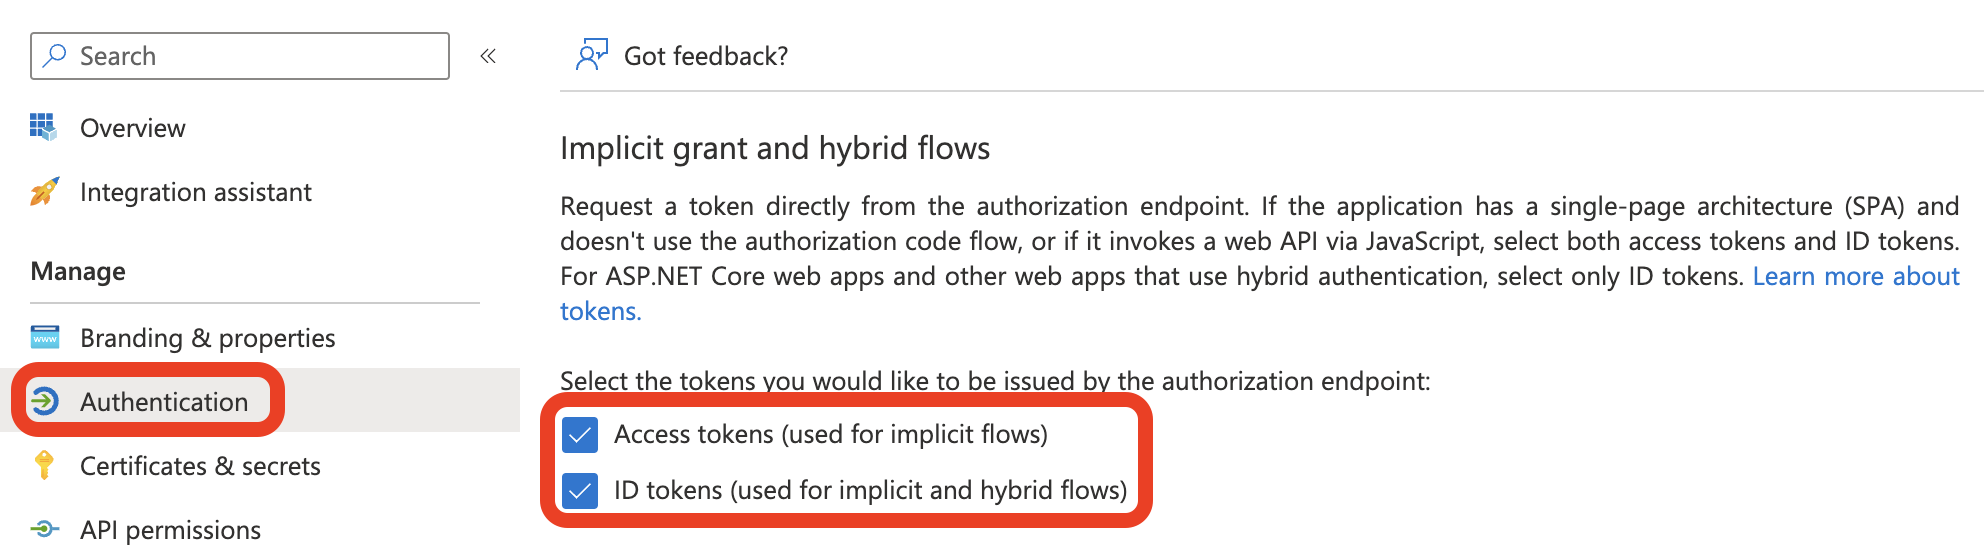
Once both options are checked, then select the Save button.
User Flow Configurations
We must set up the user flows to assist with our web app's authentication and user management. For this blog, we will configure the following flow types:
Sign in/Signup
Profile Editing
Password Reset
We need to go back to the Azure B2C instance and follow the below steps:
Select User flows within the side menu under the heading Policies. Select the New user flow button. Repeat this for each of the below.
For Sign in/Signup:
Click on Sign up and sign in, followed by Recommended and the Create button
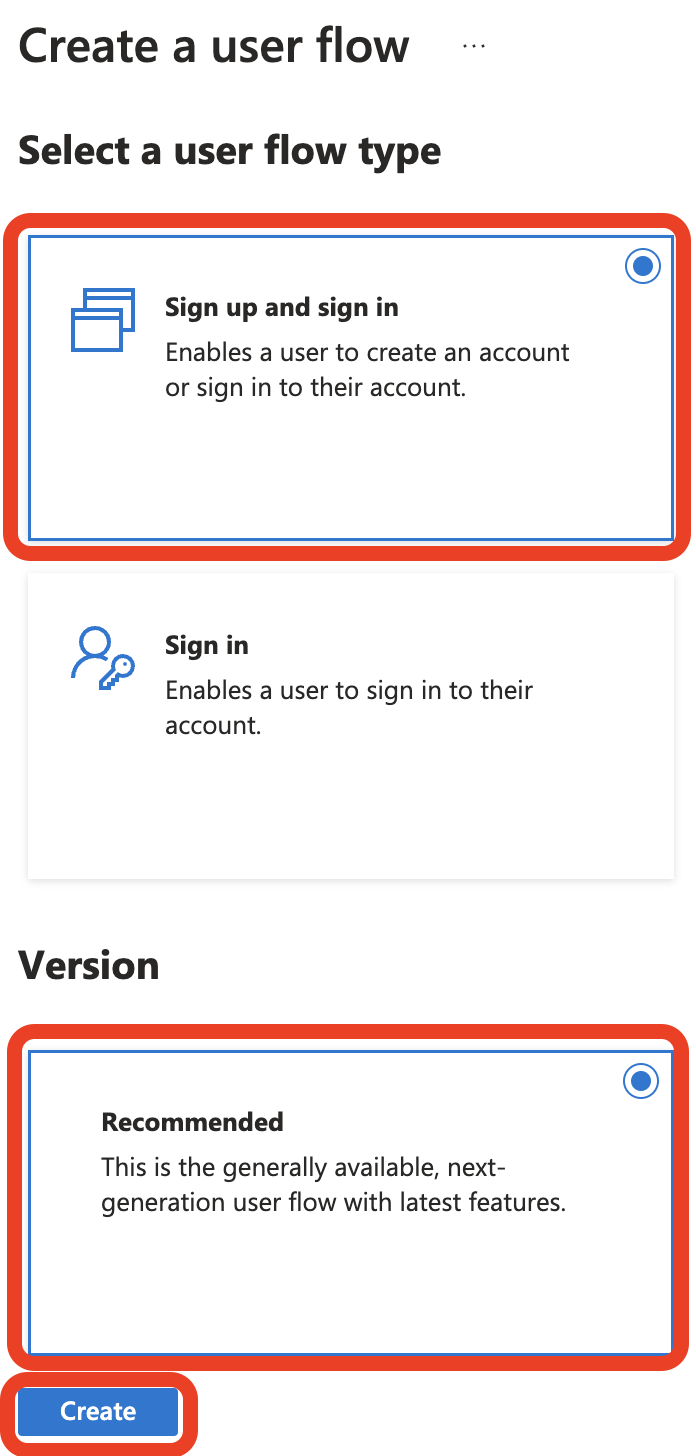
In the Name field, enter a unique string (mine is random). And select Email signup under Local accounts. This is all that is needed to get started, so click the Create button to continue

For Profile Editing:
Click on Profile editing and then Recommended. Select the Create button to continue.
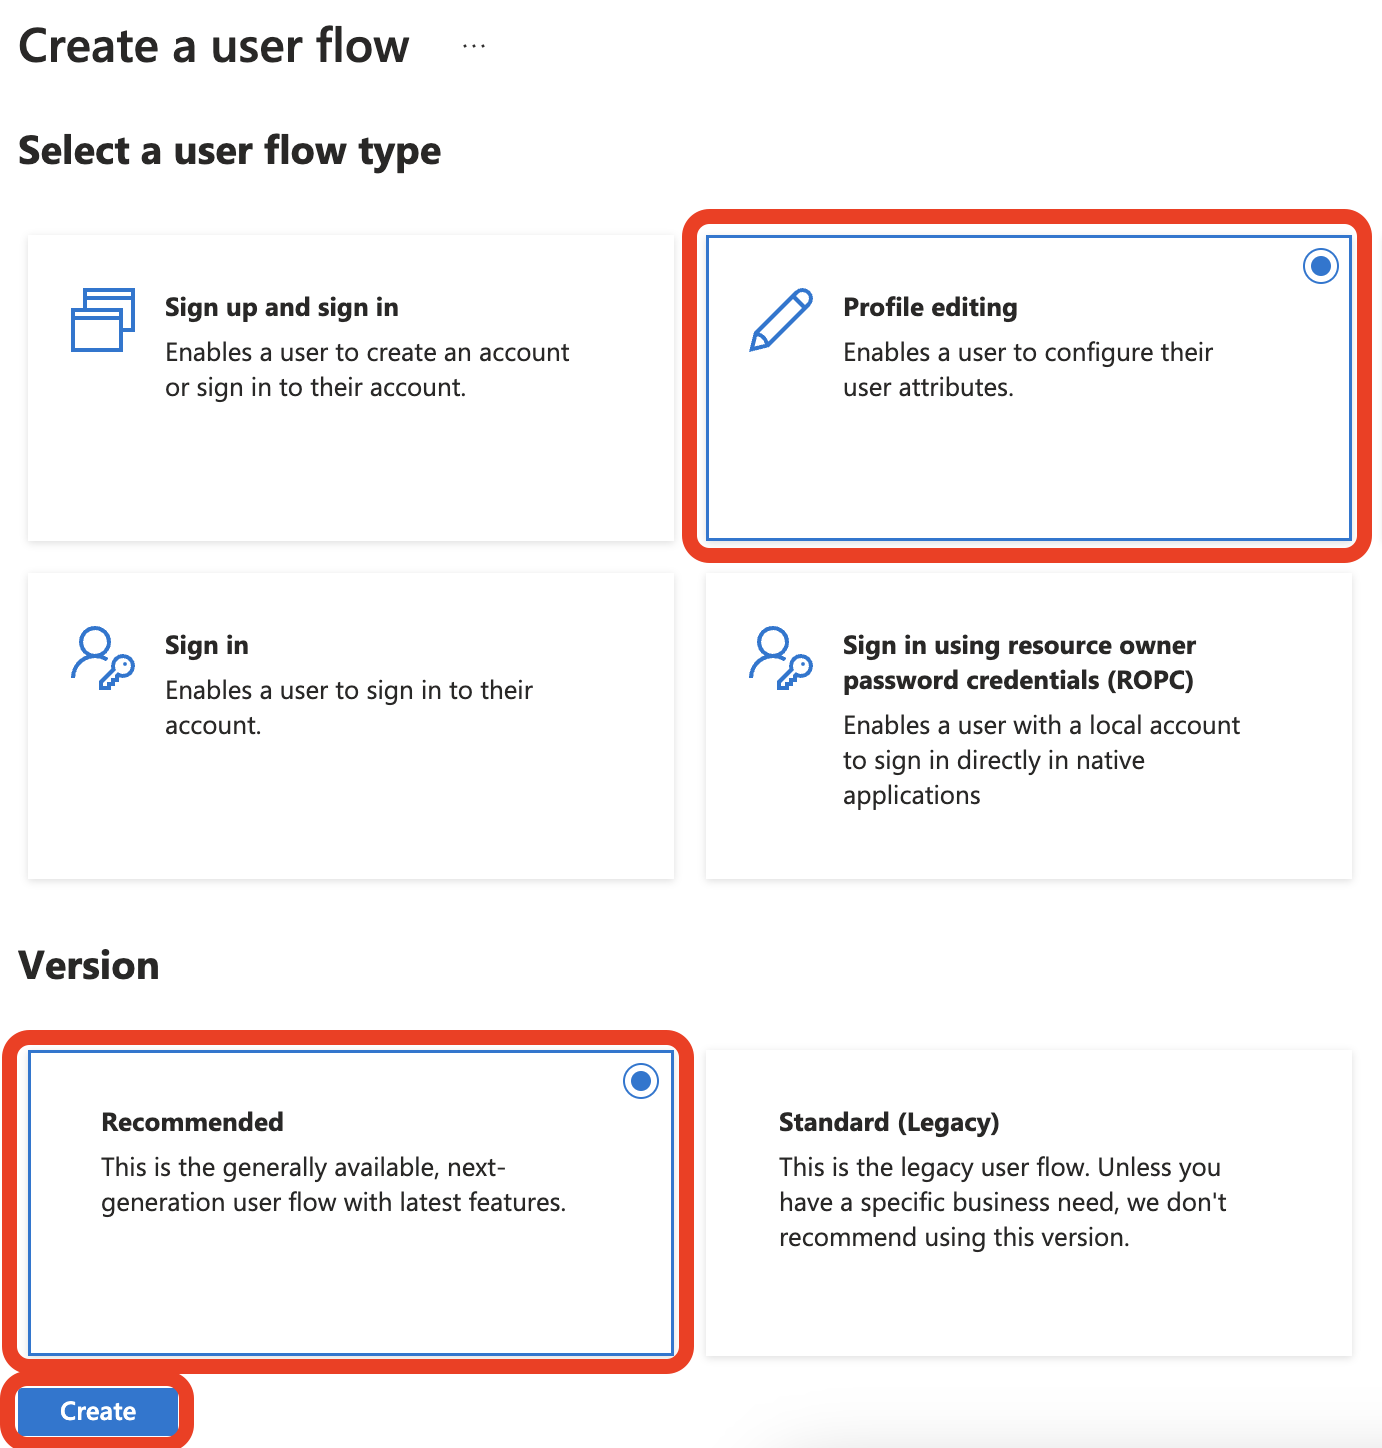
In the Name field, enter a unique string different from the others you created. And select Email signup under Local accounts. This is all that is needed to get started, so click the Create button to continue

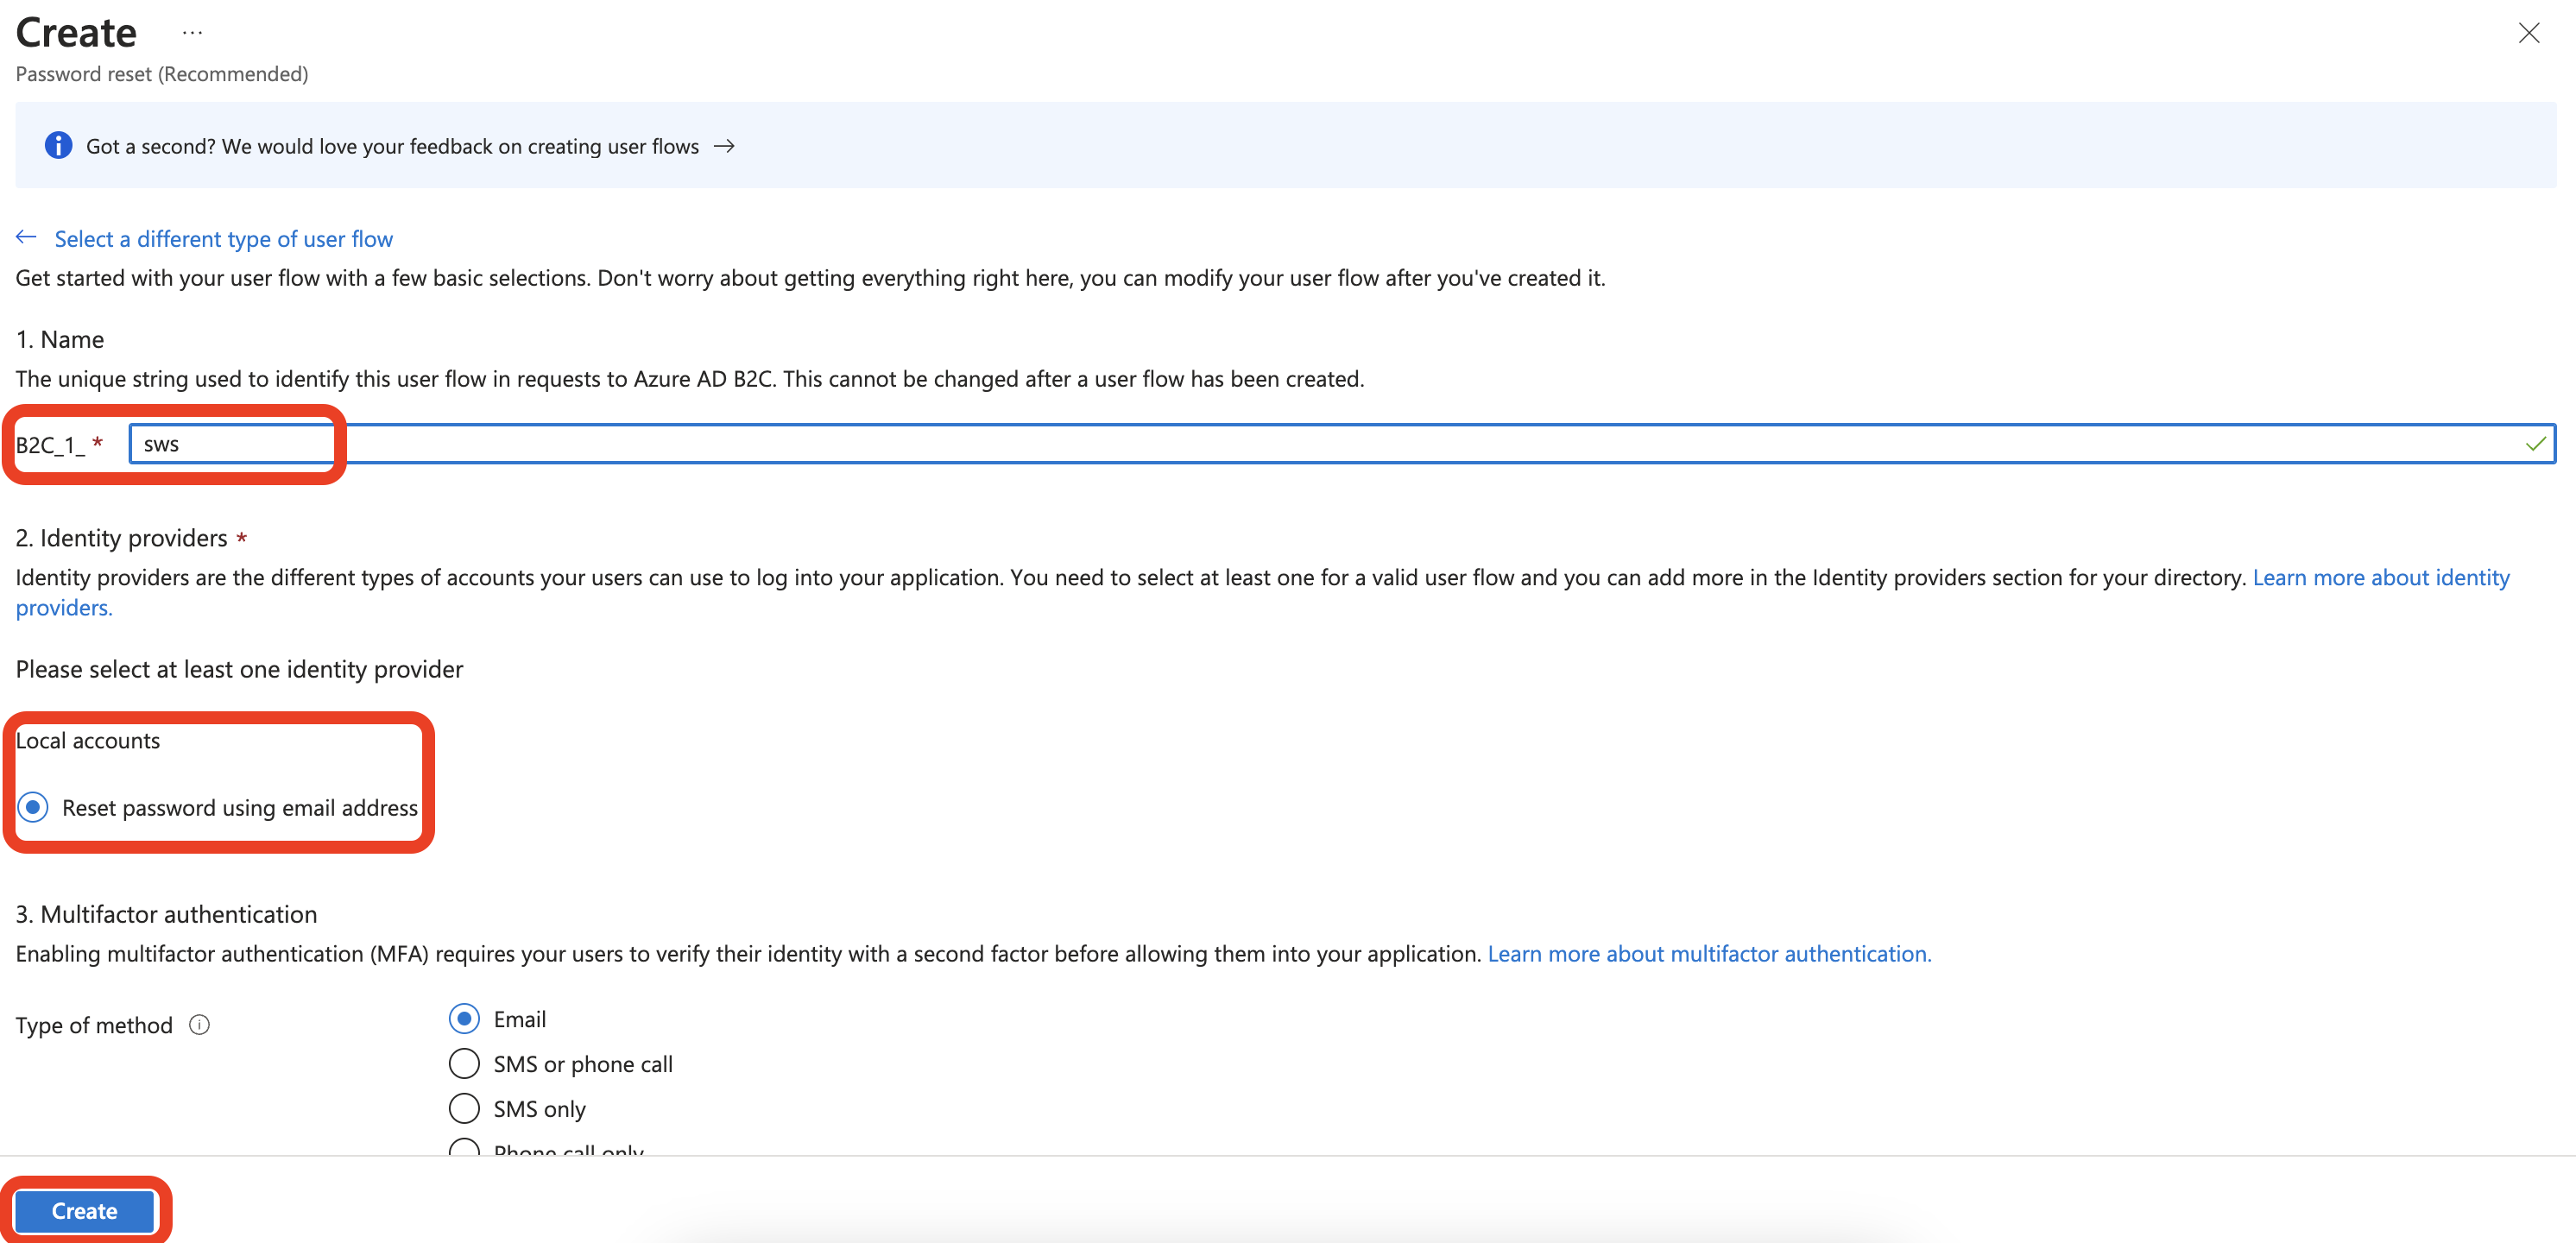
For Password Reset:
Select Password reset and then Recommended. Click the Create button to continue
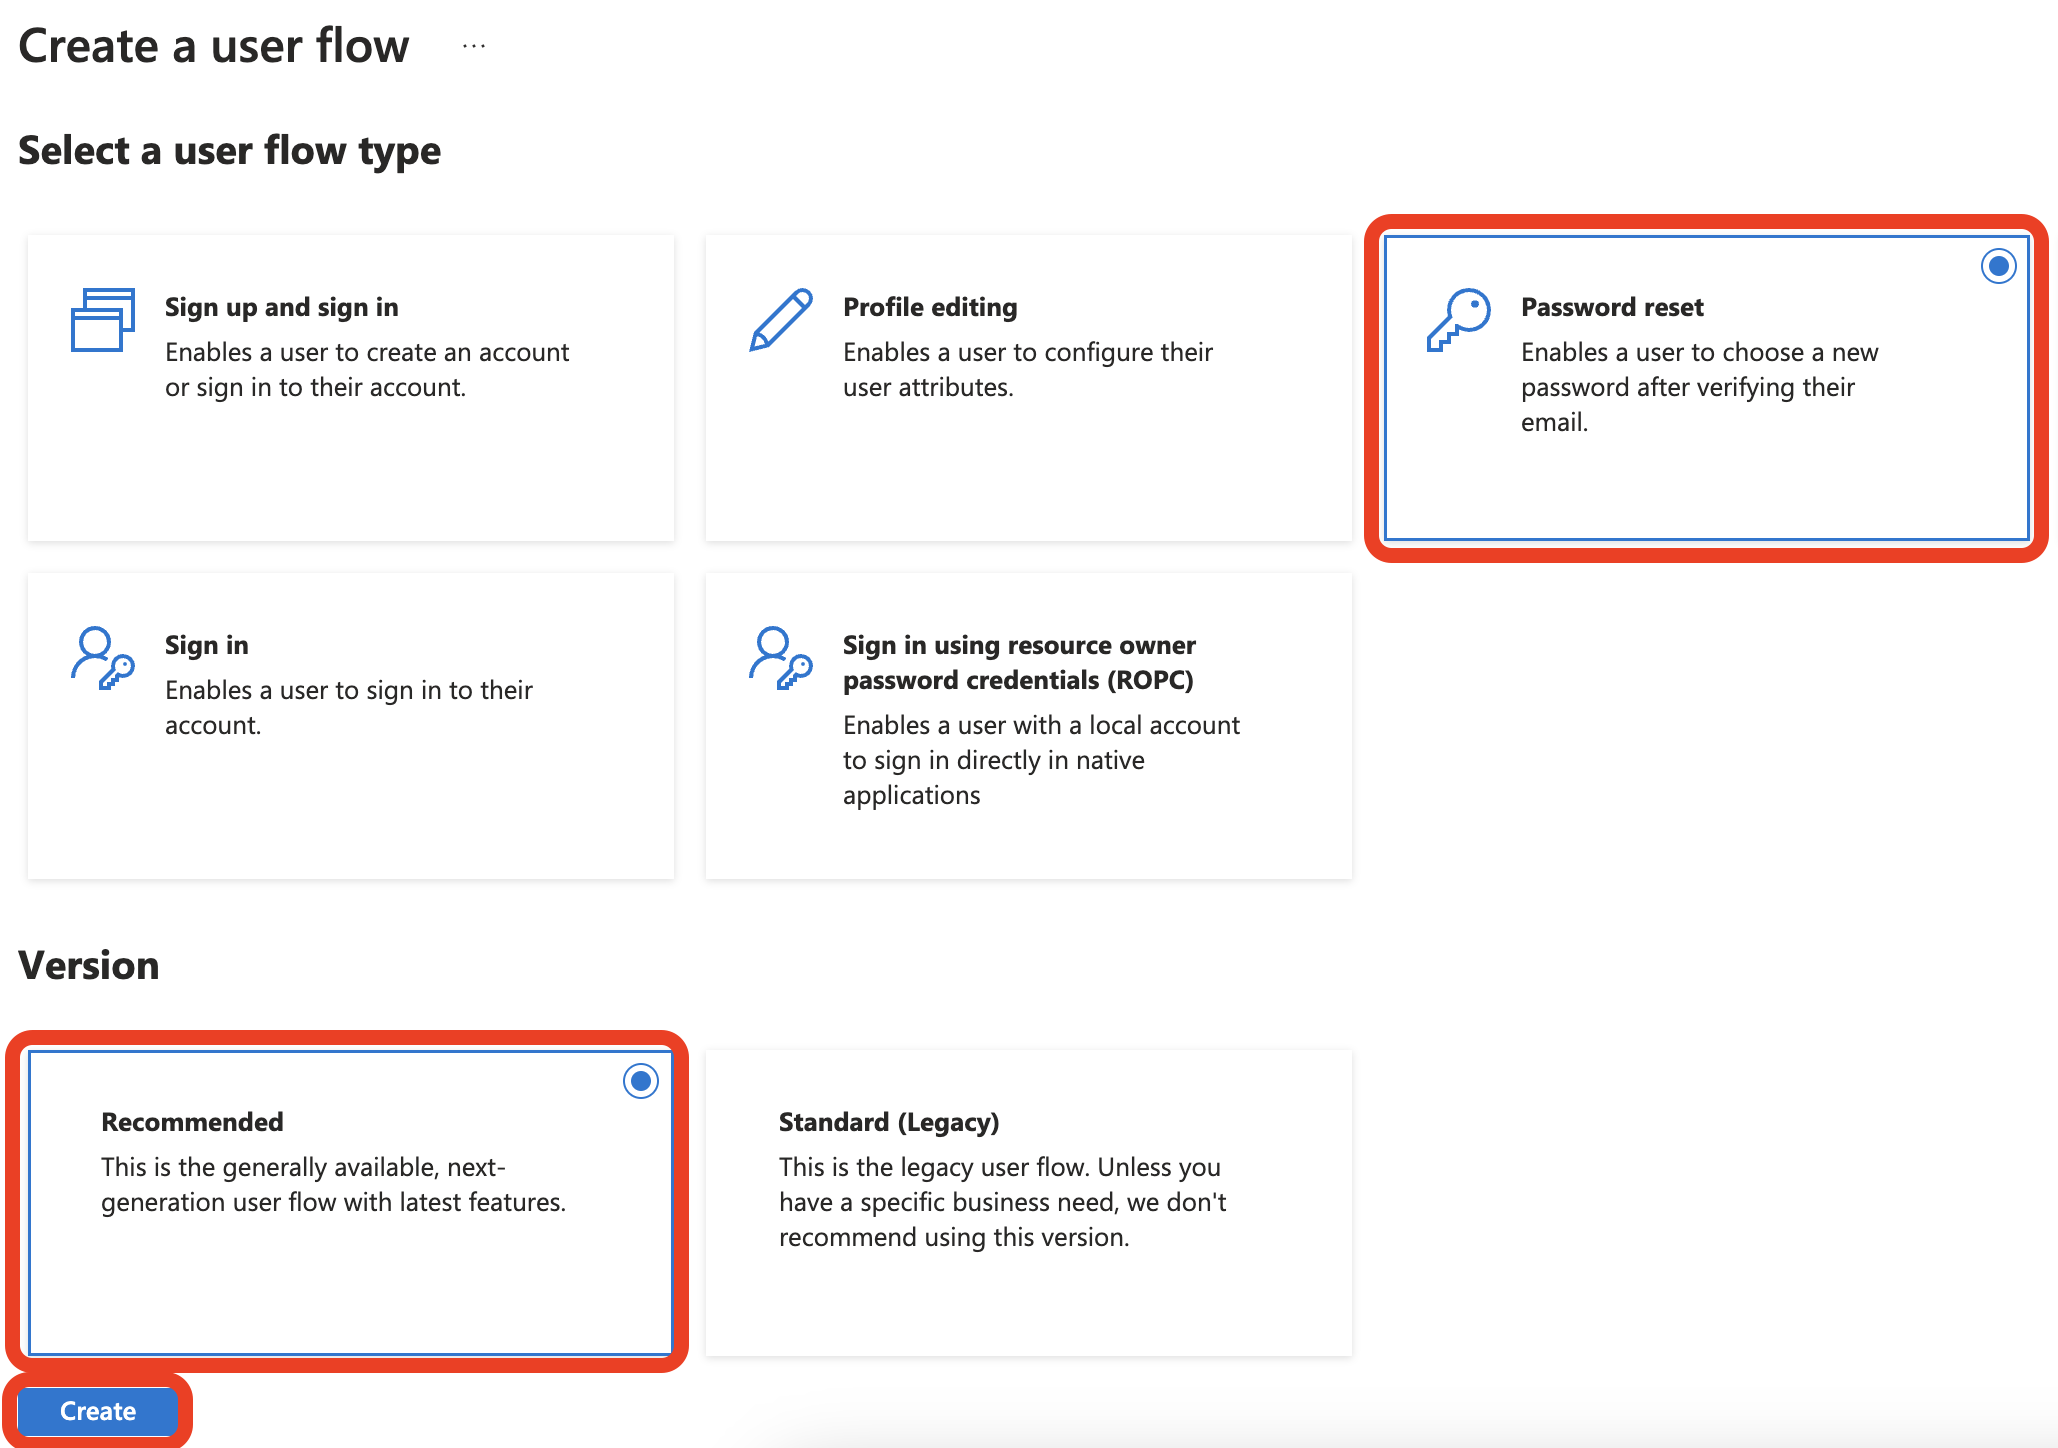
In the Name field, enter a unique string different from the others you created. And select Reset password using email address under Local accounts. This is all that is needed to get started, so click the Create button to continue
Web App Configuration
We are now ready to edit the copy of the repo mentioned in the prerequisites. First, open Visual Studio Code (or Visual Studio) and open the following path within the repo: 1-WebApp-OIDC/1-5-B2C

Once open, find the appsettings.json file in the root directory and update the JSON file to look like the below minus the example values.
{
  "AzureAdB2C": {
    "Instance": "https://mydomain.b2clogin.com",
    "ClientId": "12345-67890-24680-13579",
    "Domain": "mydomain.onmicrosoft.com",
    "SignedOutCallbackPath": "/signout/B2C_1_MyUniqueID1",
    "SignUpSignInPolicyId": "B2C_1_MyUniqueID1",
    "ResetPasswordPolicyId": "B2C_1_MyUniqueID2",
    "EditProfilePolicyId": "B2C_1_MyUniqueID3"
  },
  "Logging": {
    "LogLevel": {
      "Default": "Information",
      "Microsoft": "Warning",
      "Microsoft.Hosting.Lifetime": "Information"
    }
  },
  "AllowedHosts": "*"
}
The values you need to update are:
Instance: The first part of your Azure B2C tenant domain name combined with b2clogin.com. It should look like https://mydomain.b2clogin.com
ClientId: The App Registration you created in the previous steps will have a Client ID. You can find this by going to App registrations under the Manage side menu
Domain: The whole domain of your Azure B2C. For example, mydomain.onmicrosoft.com
SignedOutCallbackPath: The unique ID given to the Signup and Sign-in flow need to be entered at the end of the following path: /signout/B2C_1_*** where *** will be the unique ID
SignUpSignInPolicyId: The unique ID given to the Signup and Sign-in flow in the following format: B2C_1_*** where *** will be the unique ID
ResetPasswordPolicyId: The unique ID given to the Reset Password flow in the following format: B2C_1_*** where *** will be the unique ID
EditProfilePolicyId: The unique ID given to the Profile Editing flow in the following format: B2C_1_*** where *** will be the unique ID
Running Local App with B2C
We are now ready to run the local application with B2C. First, you need to run the following in a terminal while within the root of the code you are working with:
dotnet build WebApp-OpenIDConnect-DotNet.csproj
The above will build the app. Then you need to run the app, so you need to run the following in the same terminal:
dotnet run WebApp-OpenIDConnect-DotNet.csproj
You should not see any errors when running this. If any, read errors and resolve them accordingly.
You should be able to load the following address in a browser: https://localhost:44316/

And if you select Signup/In in the top right of the window, you will be redirected to a login page similar to the one below:
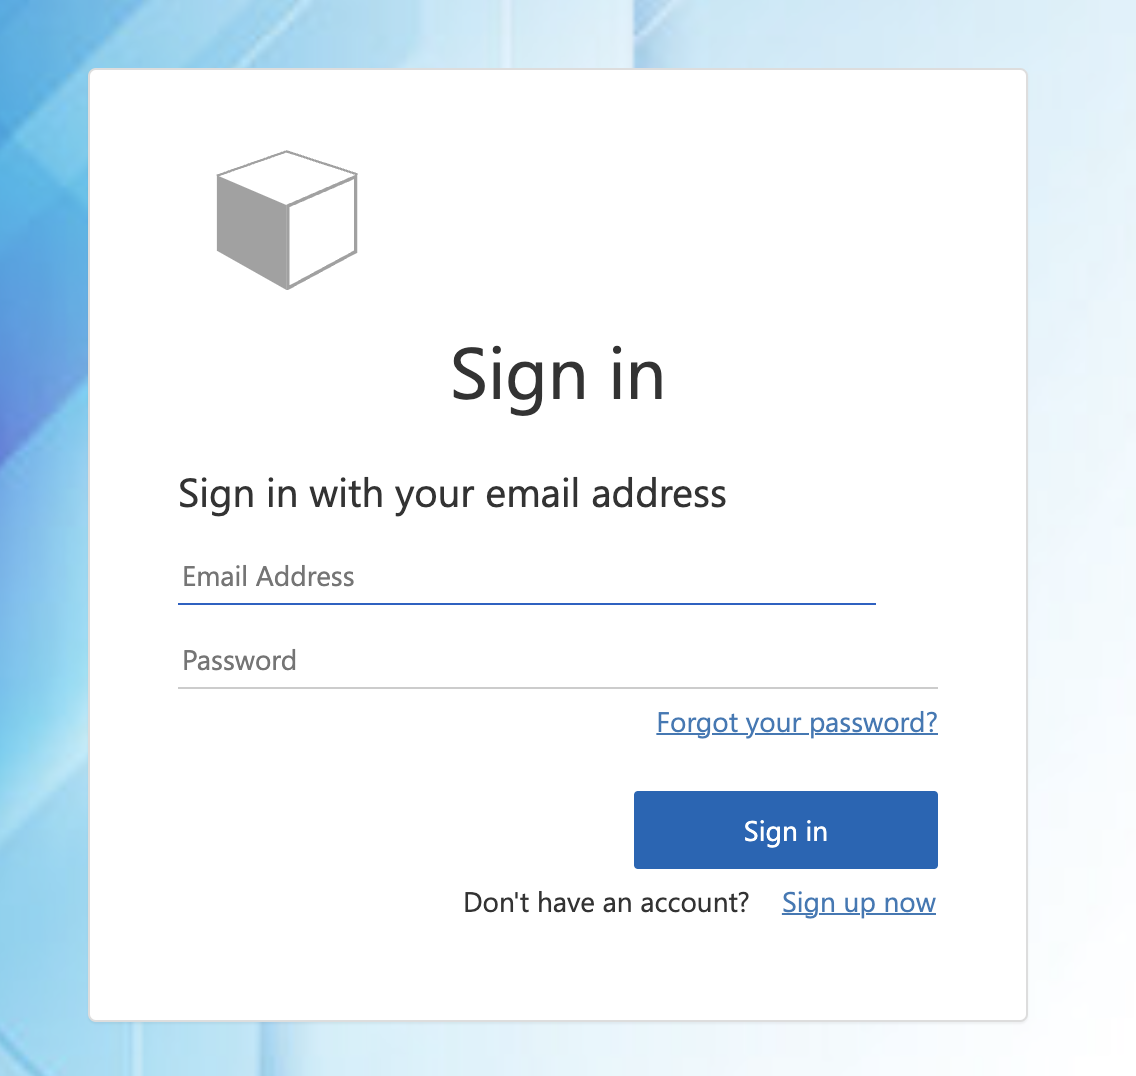
If you select the Sign up now hyperlink, you can enter an email address to send a validation code to set a password.

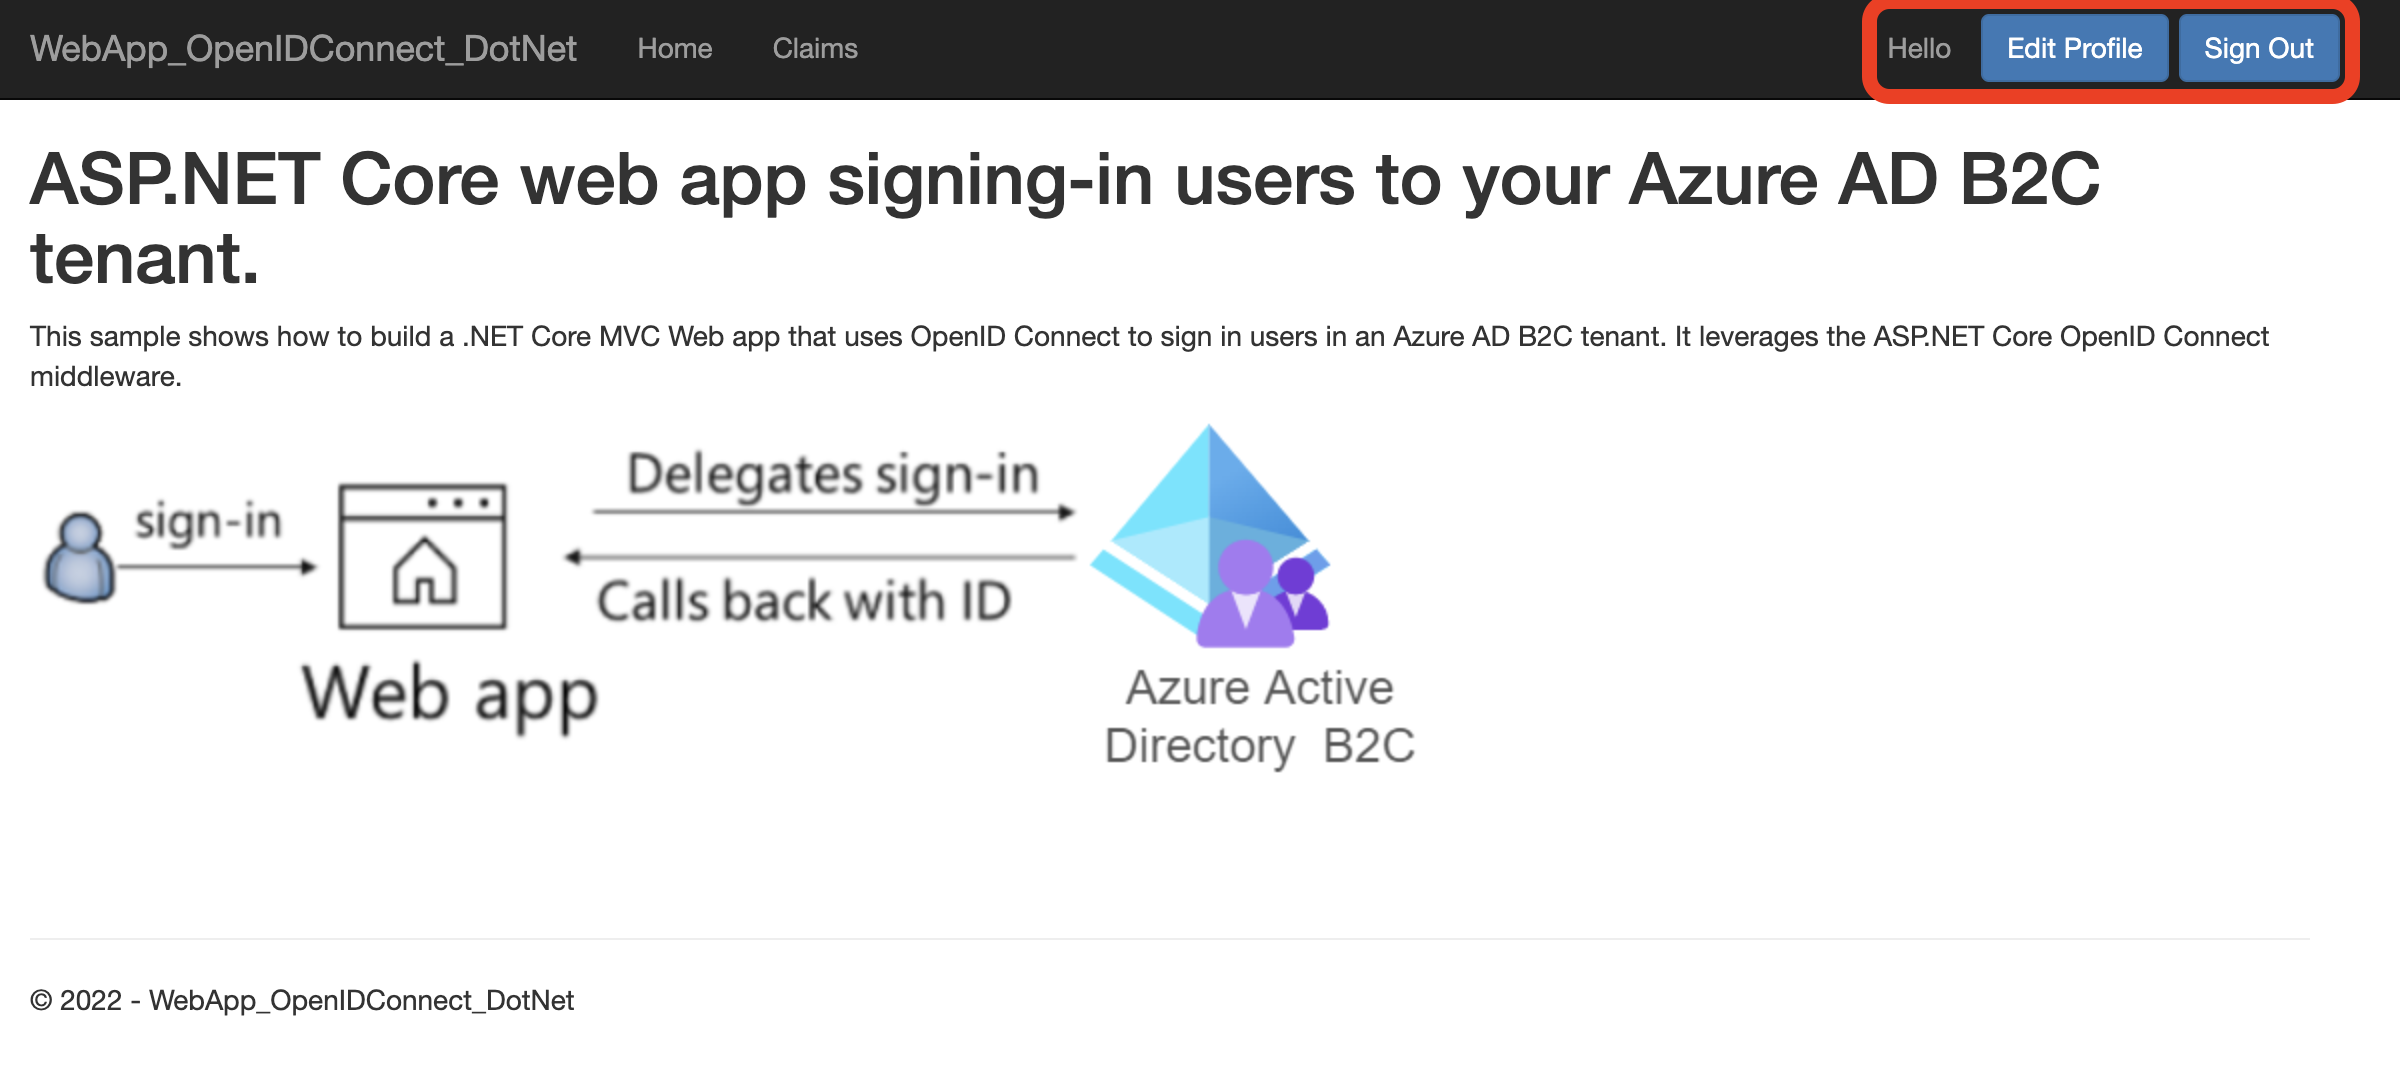
Finally, you can then test login and should be redirected to the homepage where you will see the Edit Profile and Sign Out buttons:
Follow my socials and signup for newsletters on the blog to stay updated on future posts on B2C and other Azure content.